Chicken Cordon Bleu (Gluten Free)

Chicken Cordon Bleu

I’m sure you might have noticed that I haven’t written a recipe in a while. I have just been in a food funk. I’ve been training for the physical test I’ve mentioned in my previous posts. I’ve stuck with the same old same old. I could write some recipe reviews… But I’ve just needed something that was astounding. Something to knock the socks off my taste buds.

I went to the books I had on hand for inspiration. I had one book in particular that I hadn’t really looked at in a while… I’m not a fan of their recipes because they use a lot of “gut irritants” in their recipes even though they’re technically gluten free. They’re far from Paleo and AIP. But…I keep them on hand. You never know when they’ll inspire you. Anyone who has read a recipe of mine might know… I don’t follow recipes often. I’ve been doing this enough, I can look at a recipe and tweak it to our personal dietary needs.

Here we go…

Chicken Cordon Bleu (Gluten Free)

  • Servings: 4-6
  • Difficulty: Moderate
  • Print

Ingredients:

  • Thinly Sliced Chicken Breast (You can pound it thin with a mallet.)
  • Thinly Sliced Ham
  • Provolone Cheese
  • Swiss Cheese
  • 2 eggs or A Flax Egg (For Egg Free Option: 6 Tbsp. Water, 3 Tbsp. Flax Seed)
  • Finely Ground Almond Flour (Blanched Almond Flour works best.)
  • Blanched Slivered Almonds
  1. Preheat oven to 350 Degrees F (175 C)
  2. Depending on whether you tolerate eggs or not, mix the eggs with some salt and pepper, or mix up your flax egg. Set it aside.
  3. Use a food processor to turn the blanched slivered almonds into bread crumb sized pieces. Don’t over process or it’ll turn to almond butter.
  4. Pound your chicken breasts thinly between two pieces of plastic wrap.
  5. Add the ham and two cheeses onto the chicken and roll them tightly.
  6. Place a toothpick so that it does not come open and place the roll seam side down.
  7. Dip each roll, carefully, in the almond flour.
  8. Dip into egg or flax egg mixture.
  9. Roll in the almond “crumbs.”
  10. Place in a deep casserole dish, spaced evenly.
  11. Bake for 30-40 minutes until the internal temperature reaches at least 165 degrees F (74 C). You can check this carefully by using a meat thermometer. If you don’t have one, don’t be afraid to just cut it open. Better safe than sorry with chicken.
  12. Serve with your favorite side dishes.

You can enjoy this recipe with a salad, like picture above, or you could add another of your favorite sides. I think asparagus or cauliflower mash would be very yummy. I remember what the conventional, frozen cordon bleu tasted like. It has that an enhanced flavor with half the over processed ingredients, and 10 times the satisfaction of a job well done.

I do hope if you try it that you enjoy. If you have any questions, please feel free to ask in the comments below. Feel free, also, to experiment! Try it without the breading. Try it using crumbed pumpkin seeds… Go crazy! You have my permission to make this awesome dish awesome, in whatever way that means for you.

I’m sending you an old family classic, remade, from my Common Sense Kitchen to yours. Come back next time to see what this Paleo and AIP, Crossfitter, Professional Encourager, Common Sense Cook will come up with next.

-Ami M. Lee, The Common Sense Cook
Cheesecake Filling (Gluten/Egg Free)

DSCN4212

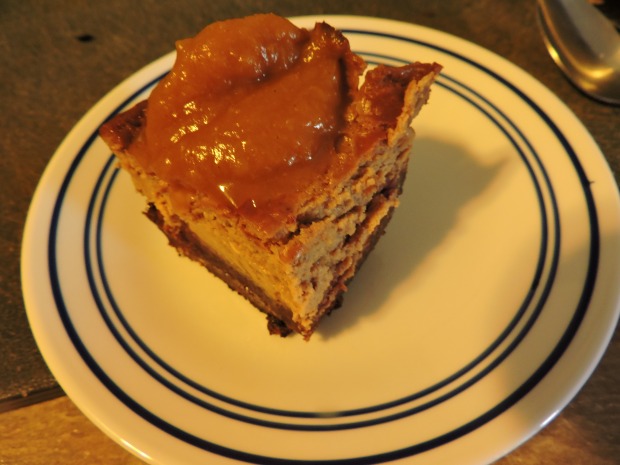
My first Egg Free Cheesecake with Pumpkin Butter.

This year I have been faced with a new challenge. My youngest was diagnosed with an egg sensitivity. It really came out of no where. He deals with really bad eczema on his legs and we will be doing more testing next month to try to pin point the cause. He’s had this since he was a year old. I was thinking of going ahead and letting him eat the cheesecake with eggs and use my conventional gluten free cheesecake recipe that I guest posted on for Moody Sisters Skincare (Here’s the link: http://www.moodysistersskincare.com/blog/2015/8/11/scrumptious-strawberry-cheesecake-recipe). But, no. I had to figure out how to do this cheesecake without affecting this cutie patootie!

I will admit that my crust did not turn out. The crust in the recipe above is really awesome if you tolerate nuts, and chocolate. But…I tried something out to avoid the chocolate (because caffeine in the chocolate hates me)… And yeah. We don’t always win. Thankfully, the filling was awesome! So here we go.

Cheesecake Filling (Gluten/Egg Free)

  • Servings: 4-6
  • Difficulty: easy
  • Print

Ingredients:

  • 2 – 8 ounce packages of Cream Cheese, At Room Temperature (Choose your quality. If you can afford organic/grass fed, go for it! But don’t feel obligated.)
  • 2 – 8 ounce packages of Mascarpone, At Room Temperature
  • 1 1/4 Cups of Coconut Sugar
  • Flax Egg (2 Tablespoons Flax to 3 Tablespoons of Water)
  • 2 Teaspoons Fresh Lemon Juice
  • 1 Teaspoon Vanilla Extract
  • A Tiny Pinch of Pink Himalayan Salt

It is very important that you have your ingredients at room temperature. Don’t skip this step. Also, because this recipe is only for the filling, take care of your crust now so it can be pre-baking (if needed). Preheat your oven to 375 degrees Farenheit.

  1. Mix your flax egg at the proportions above. Stir until it is well mixed and place in the fridge for 15 minutes. This is what will replace the eggs. If you have issues with flax, try a gelatin egg instead! (And let me know below if it worked!)
  2. Mix the cream cheese, mascarpone, and coconut sugar together until well combined.
  3. Add your flax egg. You might be cautious and add it in a quarter at a time and mix as you go.
  4. Add the final ingredients of the lemon juice, vanilla extract, and pink salt and mix until it is all well combined.
  5. Taste, taste, taste! It doesn’t have raw eggs so go ahead and give it a try to see if you’d like to add something else. (I wonder how pumpkin pie spices would be…)
  6. Add your filling to your crust. This makes a LOT of filling so I made sure to put some parchment paper in the dish so that I could avoid spillage and after it set, I could pull it right out of my pan. (I didn’t have a spring form pan this time.) I also didn’t worry about the water bath since I didn’t have the right pan. I used a deep, square, glass pan that worked great!
  7. Bake at 375 degrees Fahrenheit for 45 minutes to 1 hour and 5 minutes. Keep an eye on it, because it could come out earlier.
  8. Let the cheesecake completely cool. This is very important. Do not put a hot cheesecake in the fridge, my friends.
  9. Cover lightly and refrigerate over night and wake up to an amazing cheesecake!

I hope you will give this filling a try. Find your favorite crust and try your best to share with your friends or family, even though it’s tough. I actually topped this off at Thanksgiving with some pumpkin butter. I used this recipe from The Paleo Parents (http://paleoparents.com/2011/pumpkin-butter-and-apple-butter/) but feel free to use any fruit or sauce that you love.

I’m sending you a yummy alternative of an old favorite from my Common Sense Kitchen to yours. I hope you’ll come back soon and see what else I can whip up for the holiday season.

-Ami M. Lee, Cheesecake Lover, Not Afraid to Fail, Common Sense Cook

Lemon Pepper Marinated Chicken Wings (Paleo/Gluten Free/Aip Options)

I brag a lot about my kiddos. Truly, I know I am biased but I have really been impressed with my oldest getting interested in cooking. She’s constantly asking to help and I’m always trying to find something for her to do. It may be because some of our favorite shows are Gordon Ramsay’s including Master Chef Junior. They even call the back yard our “garden.” Madison even comes up with some good ideas from time to time.

I ask the kids every week what they would like to eat. I believe this helps them feel like they’re included in the decision and they’re more likely to eat it. This week Madison said, “I want some chicken wings. Please!” A great idea was born and I even added it to my batch cooking for the week.

Here’s what you’ll need:

  • A pound of Chicken Wings (I used the drumette ones.)
  • The Juice of One Large Lemon
  • Olive Oil (Varies… Add enough to coat, but not drown.)
  • Fresh Cracked Pepper (Omit for AIP)
  • Pink Himalayan Salt (To Taste)

I would have to say my favorite recipes are the ones with the shortest ingredient lists. To marinate this ahead of time, add all of the ingredients into a ziplock or other container of choice. Let marinate for a few hours, overnight in the refrigerator, or freeze until needed. Make sure to defrost under refrigeration the night before if you do freeze them.

Remove the chicken from the bag and toss the left over marinade. There are two ways that you can cook this; under the broiler or on a grill. You choose! But I’m thinking the grill is always the best. You can stress relieve by hanging outside in the sunshine, with your loved ones, and cook at the same time. Just make sure they’re fully cooked in the middle. Remember, the smaller the wings, the less time they take. Cooking times will vary, but if working with your broiler do it in 5 minute intervals, and flip. Return it to the oven until done and desired color.

It’s really that simple. My favorite kind of recipe! I hope you’ve enjoyed this recipe. No picture yet, but as soon as I pull out the next batch I’ll be sure to update. Until next time, I’m sending you easy to pull off meals, from my Common Sense Kitchen to yours.

-Ami M. Lee, Batch Cooking Wizard, The Common Sense Cook

Guacamole (Nightshade Free/Paleo/AIP)

Last night was Taco Night here in the Lee Household. Our kids were excited but I was feeling it was becoming a little over done. I am not the kind of person who can eat the same thing every week. Ironically…I used to be, but now my taste buds crave some adventure. I happened to have an avocado in the fridge so I said…Let’s video some guacamole…The rest, is history…

Here’s what you’ll need for this epic guacamole:

  • 1 Avocado (You can use more if you have more than 1 adult and 3 littles.)
  • 3 Small Green Onions (Or 1-2 Large)
  • Salt and Pepper (Omit Pepper for AIP)
  • The Juice of One Small Lemon (Or half of a large)
  • A Couple Dashes of Red Wine Vinegar
  • 1/2 Teaspoon of Dried Cilantro (Add to your liking.)
  • 1 Teaspoon of Crushed Mint

This is so easy I feel like giggling. All you have to do is throw all of this into a food processor and blend till creamy. The hard part is trying to share equally with everyone!

I hope you enjoy this super fast recipe. If you’d like to see the video, I’ll link it below. If you don’t believe that my kids could ever like something like avocado…check it out so you can see, kids can love real food too! (No, they weren’t paid for their opinions with jelly beans…I promise!)

I’m sending tangy, yummy goodness from my Common Sense Kitchen to yours. I hope you’ll come back next time and see what this recipe make’er up’er can do next.

-Ami M. Lee, The Common Sense Cook

Flashback Friday – Predominately Paleo Taco Shells, Two Ways (AIP Friendly)

I mentioned in my Month in Review for February that one of my favorite bloggers recently has been Jen from Predominately Paleo. She shares a wide variety of recipes that are often easily modified (or are) AIP Friendly! Not only that, but even my kiddos who don’t require their diet to be strictly AIP, enjoy many of her recipes.

I had read plenty of her blogs…pinned several. But, when it came to what I actually wanted to do I was a little unsure. The first time I tried this I messed up. I used coconut oil instead and ended up with a thick, hot mess… However, I happened to press some into a cupcake tin and made some amazing taco shell bowls! So if you want cupcake, taco bowls…Switch the avocado oil for coconut oil. Bake for 20 minutes and you’re done. If not…Stay tuned and try another way. It never hurts to know how to use a recipe in more than one way.
Here’s what you’ll need:
⦁ 3 Ripe Plantains (They should be heavily spotted, yellow, or black.)
⦁ 1/2 Cup Avocado Oil
⦁ 1 Teaspoon Garlic Sea Salt (I just used garlic powder and sea salt separately.)
⦁ 1/2 Teaspoon Onion Powder (left out)
⦁ Optional: 1 teaspoon hot sauce (not AIP)
⦁ Optional: Juice of half a lime.

Preheat your oven to 350 degrees.
Add all of the ingredients to a blender. Process until it turns into a consistent, slightly thick batter. Cover a baking sheet with parchment paper or aluminum foil. I decided to add some coconut oil to try to keep it from sticking…but it definitely still stuck on pretty well. If you’re okay with using non stick aluminum foil it does help. (I don’t know how this stuff works, but it’s magic and did help the next time I made these).
Add a spoon full onto the baking sheet and use the back of the spoon to spread it out. Mine ended up being 2ish inches wide making some awkwardly shaped, baby taco shells. I may consider making fewer taco shells and opting for larger ones next time. Try to get them even and flat, keeping the size of your palm a good consideration for size (according to the original recipe that I’ll link below!).
Bake for 20 minutes. You’ll want to carefully try to flip them. I’m wondering if the parchment paper would have done better because I had a hard time flipping these bad boys. A good, flat spatula was helpful. Throw them back in the over for 10 minutes.
Here comes the dangerous part…Are you scared? Don’t be! Set those tacos on a plate. Place the baking sheet on your bottom rack to catch any crumbs or drippy grease. Drape the tacos directly over a bar on the oven rack. I found tongs very useful in helping to bend them without getting my fingers too close to the rack. Jen has some links on her blog to taco racks that are probably much easier and safer to handle that you can check out.
My tacos came out awful crisp and so close to burnt. It’s suggested that they go back in for another 20-30 minutes. I think this will depend on the size. If you have little baby tacos like me, it can be as quick as 10 minutes!
Carefully remove them from the oven with some tongs. I went ahead and left them folded to cool, and dry a few minutes. Add your favorite taco fixin’s and you have an amazing, flavorful taco shell creation that is sure to please! I know that we loved them! It was a little tricky at first, but I think once you get this down, it’ll be Taco Tuesday every Tuesday. Even if you’re not paleo/aip I hope you’ll try out this yummy alternative. Here’s is the link to Jen’s original recipe (http://predominantlypaleo.com/grain-free-taco-shells-paleo-vegan/).
I hope you enjoy this recipe review! Be sure to check out Jen on her website and on Facebook. She is very interactive and just the sweetest and brightest energy I’ve seen from a blogger. I just want to find her and make her my blogging best friend! Make sure y’all come back and see me on Manic Monday where I try to give you guys some of my quicker recipes to help you through dealing with a case of the Mondays!.
-Ami M. Lee, Taco Destroyer, Common Sense Cook

Gluten Free Cheesy Bread Sticks

Let me begin this with…We’re all human with weird cravings. Even us paleo’s sometimes miss conventional foods. If you’re like me…It is just NOT an option to slip up. Gluten exposure leaves me feeling awful. Too much dairy and I feel like a balloon. Same goes for too much almond butter (I love Almond Butter a little too much). One night my husband was talking about food we used to eat and I got to thinking about cheese filled bread sticks. The kind we bought were like eating an Olive Garden bread stick with a mozzarella cheese string in the middle. Talk about unhealthy habits, I could eat 5 or more by myself.

I had made a pizza dough from The Domestic Man (link at the end) that used parmesan cheese in it. Technically primal more than paleo. From my understandings, primal diets are more okay with dairy. Hard cheeses like parmesan, from what I read, are much more tolerable. My very lactose intolerant kiddo was even okay with these! I’m really starting to think there is a correlation between (at least for my child) the quality of the dairy and his tolerance level. But any hoo…On to the bread sticks y’all!

Here’s what you’ll need:

  • 1 1/2 cups tapioca starch or flour (it’s the same thing)
  • 1/4 cup each heavy cream and water (or 1/2 cup coconut milk instead of cream & water)
  • 2 tbsp butter
  • 1/2 tsp salt
  • 1 egg, beaten
  • 1/4 tsp dried oregano
  • pinch of white pepper (I used black pepper just fine.)
  • 3/4 cup parmesan cheese (or any hard cheese), grated

Preheat your oven to 350 degrees Fahrenheit.

In a saucepan, combine the coconut milk, butter, and salt and bring to a simmer on med/low heat. You want to get it to the point that it’s starting to bubble, but not boiling. In a large bowl, add the tapioca starch. When the cream/water mixture is heated, add it to the starch and stir it all together. I use a spoonula to mix gently. It can get flaky, but that is okay. Let it cool for 5 minutes.

Line a cookie sheet with aluminum foil. Rub down with a little butter or coconut oil to help prevent sticking (as much).

Add the beaten egg to the mixture, and knead together with your hands. Add the cheese, white pepper, and oregano, and mix together until it’s dough-like.

Take about a golf ball sized piece in your hand. Depending on how sticky the dough is (I’ve had it be super sticky, and not very sticky at all…almost conventional dough like) you may be able to roll it in a ball, then push lightly with your fingers and roll it out into a snake. I’m thinking that the kind of cheese may have affected the consistency of the dough. The best one so far was an aged Romano.

This recipe, as is, makes about 6 about 5 inches long. They may vary in size, but that’s okay. I found that the ones that were about two fingers width wide were the best. Lay them on the cookie sheet and throw them in the oven for 25 minutes. They should be starting to turn a lovely golden brown color.

Let them cook a few minutes and peel them off the aluminum foil. I think that it is very important that you have the foil for easier clean up and removal after they’re cooked.

These bread sticks are crunchy on the outside and chewy, gooey, cheesy on the inside. My non-paleo husband wasn’t too sure about the texture. So, you may be cautious if you have family members that are really picky about textures of food. However, me and the kids ate them up! It may have been a long time since I had conventional bread, but I was thoroughly satisfied! This went great with Potato Soup (recently blogged).

I hope you enjoy this recipe! I encourage you all to look at recipes and find ways to use them more than the way they are printed. You never know what amazing things you could come up with! Don’t forget to check out the original recipes for The Domestic Man’s Cast Iron Skillet Grain and Gluten Free PIzza (http://thedomesticman.com/2012/12/13/cast-iron-skillet-grain-and-gluten-free-pizza/). As always, I’m sending you warmth and cheesiness from my kitchen to yours! I hope you’ll come back next time to see what recipe I’ll work with next.

-Ami M. Lee, Cheese Loving, The Common Sense Cook

Jazz Up Some Gluten Free Bisquick

Pumpkin Spiced Pancakes

A family member was so kind to send the kids a bunch of treats! Included in one of the boxes was some gluten free bisquick. GF Bisquick is not paleo because it uses Rice and Soy, but I follow the 80/20 rule for my children, and occasionally go ahead and eat it myself. As Julia Child says, “Everything is fine in moderation, including moderation.”

I have mentioned in past posts that I have never been a fan of breakfast foods. So I was thinking on this plain GF Bisquick thinking…What am I going to do to jazz this up. I am out of almond butter and jam… Pumpkin spice! I have been using it a lot lately whether I put pumpkin in a recipe or not (like the Paleo Granola recipe). Hip trends aside, it’s just a great spice combination.

Here’s what you’ll need for these Spiced Pancakes:

  • 1 Cup of Gluten Free Bisquick
  • 1 Egg
  • 2 Tablespoons Coconut Oil
  • 1 Cup Full Fat Coconut Milk
  • 1 Teaspoon cinnamon
  • 1/4 Teaspoon Nutmeg
  • 1/4 Teaspoon Giner
  • 1/8 Teaspoon All Spice
  • 1/8 Teaspoon Cloves

Measure out all of the ingredients and add to a good sized mixing bowl. Mix well until all ingredients are well incorporated. The batter turned out very thick. I took a spoonula and took about a palm sized amount in my hand. The pancakes turned out much better if you roll it in a ball, then slightly flatten it.

Add a smidgen of coconut oil to a small pan.

I did one pancake at a time. This allows you to flip the pancakes instead of having to use a spatula. I’m working on a short YouTube video to show you what I did. The smaller, palm sized cakes did the best flipping. Too big and it flips about like an omelet. Too big and it’s like dough in the middle. Keep it small, do one at a time, and you’ll be successful.

If you enjoy syrup, or let your kids have some, make sure to buy the good stuff and avoid high fructose corn syrup. It’s expensive, but well worth it.

I hope you enjoy this modified recipe. I invite you to feel free to take any recipe and modify it for your own needs. Don’t settle for plain and bland. Be bold and kick it up a notch! Come back next time and see what recipe I’ll try to fiddle with next.

-Ami M. Lee, The Common Sense Cook

Julia Child quote

Manic Monday – Super Easy and Super Fast

Even as a stay at home mom, I still get a case of the Monday’s from time to time. Whether it is Monday or not. So what do I look for in a Manic Monday recipe? I love slow cooker recipes, and things I can throw together in a pinch. These are also great recipes for when you want to cook and avoid unhealthy fast food, but may not be feeling up to a full, long prep work meal. I hope to bring you some of these ideas on Mondays in the future.

Here’s a quick paleo meal that could appeal to even the most conventional non-paleo. You might even be able to fool your family as to whether this is healthy or not!

Now let me preface all the argumentative people who like to dictate “what is or is not paleo.” Potatoes are usually included in “not paleo.” However, potatoes of all kinds are great and budget friendly. It’s also a great alternative to instant potatoes, rice, or any other processed food. So, every now and then, go ahead and enjoy a potato if it sits well with you.

Here’s what you will need:

Chicken:

  • Chicken Breasts (1 for each adult, 1 for 2 itty bitty kiddos like mine.)
  • Gluten free BBQ (or make you’re own…I will try to post my recipe soon.)

Mashed Potatoes:

  • Your favorite kind of potato (I love yellow golden.)
  • Almond milk, unsweetened
  • Unsalted, Grass-fed Butter
  • Pink Himalayan Salt
  • Fresh Cracked Black Pepper

Green Beans:

  • 1 Can of Green Beans (Yes…budget friendly…canned green beans.)
  • 1/2 cup Mushroom Broth (See previous post on Mushroom broth.)
  • Pink Himalayan Salt
  • Fresh Cracked Black Pepper

Trim the chicken breasts of any excess fat, skin, or as I like to think…Icky bits. Drop them in a pot of boiling, salted water. Softly boil them for 20-30 minutes until it is done. Don’t over cook, just until it is no longer pink. Put the breasts in a large bowl. Let it cool just long enough till you can touch it. Then pick it up and pull it apart. Add your favorite barbeque sauce. Keep an eye out if you’re gluten free like our family. It can hide in barbecue sauce. Always check the ingredients or make you’re own! (I’ll put it on my list of things to blog.)

Peel and cut up your potatoes. If you cut them into smaller pieces, they cook much faster. Boil them away for 20 minutes or so until you can stick a knife through a piece and it easily slides back off. (Be careful and don’t let it splash boiling hot water on you!) Drain the water and dump the potatoes back into the pan and drop in about a tablespoon of grass-fed butter. Use a whisk and make sure the butter melts and start to mush up the potato. Add just a splash of unsweetened almond milk. Add to your own taste, salt and pepper. Use the whisk and push and squish, and mash. Depending on the potato it may can become creamy. I rather loved this when I made it and my kiddos didn’t know the difference.

The green beans can cook as long as you’re working on everything else. Open the can of green beans and drain. Add 1/2 cup to 1 cup mushroom broth (depending on how many beans) to a small sauce pan. It doesn’t have to cover the beans. Add the salt and pepper. Let this simmer away. The broth really helps get rid of that canned flavor. My mom even asked me if these were fresh!!!

So there you go! On this Manic Monday…Remember to Keep Calm and Cook on! Keep quick meals in the pantry and on your grocery list so you’re less tempted to go get fast food. This is REAL food FAST! I’m sending you a quick meal that is good for you from my kitchen to yours! I hope you’ll come back next time and see what this Manic Monday Conquering, Common Sense Cook will whip up next.

-Ami M. Lee, The Common Sense Cook

Mushroom Broth

It’s getting so close to fall here in Arkansas. If you live anywhere north of us, it may already feel like fall. It’s time for pumpkins and stews. Oh, I love a good stew. I made a great beef & butternut squash from Autoimmune Paleo last night that was soooo delicious!

However, one day, I was going through my pantry and happened to pick up a box of my “favorite” organic box of chicken stock. I’ve been buying it for years. Ingredients are clean and organic but wait…what the heck is this y’all!? Allergen warning: May contain wheat. -____-
Unfortunately for me, being pretty allergic to gluten, I can’t use it. I was a bit furious at the time because the ingredients didn’t list anything that was a known gluten product, except the “natural flavors” and most companies distinguish between, produced in the same facility as, or produced with an ingredient that may have. So what did I do? I made. Stuff. Up. (Are y’all seeing a theme yet?)

Here is what you’ll need for this gluten free broth:

  • 1 package of portobello mushrooms
  • A lotta water (Enough to fill a big soup pot. Store the extra!)
  • Bay Leaf
  • Salt and Pepper
  • Rosemary

In my DDP Yoga guide they mentioned using mushroom broth but didn’t leave a recipe. This is so easy. It stores beautifully in the fridge for you to pull out whenever you need it.

Simply add everything into a big pot of water. My regular sized soup pot held about 15 cups of water and I ended up saving 2 quarts, plus the 2 cups I used for supper that night. Bring everything to a slow boil and turn the mushrooms every so often. This really shouldn’t take more that 20 to 30 minutes. We’re basically making brown, flavored water. Don’t let it boil over, just let it bubble away until dark brown.
Transfer this dark brown liquid into a storing container and let it cool. If you want a stronger flavor you could leave the mushrooms to sit in the broth over night. Then, pull them out and discard them (or save them for your friends compost pile :)).

I’ve put this in stews, chilli, soups, and even used it with a can of green beans to pull out that canned flavor. My mom even asked if they were fresh green beans! This is a great staple to keep in your fridge. I believe I kept mine for a week or two in the fridge and it worked out fine every time. It’s also a great way to sneak in other veggies into the family diet.

I hope you enjoy this recipe. If you give a try come on over to the Facebook page (www.facebook.com/commonsensecook) and show me a picture! Really, if you’re a beginner cook, this one is just too easy to mess up. Come back next week to see what this crazy hippie gal Common Sense Cook makes up next.

-Ami M. Lee, The Common Sense Cook

Sweet Saturdays

Last weekend we celebrated my oldest and youngest’s birthdays! Madison turned 5 and Mark turned 3! Can’t believe my babies are growing up so fast. My kids are actually pretty sensitive to gluten and dairy. Rylan and Madison seem to handle it okay, maybe just an icky tummy day and some attitude issues. Mark on the other hand is so extremely sensitive. This was my first year trying to make a paleo birthday party. Madison asked for an apple pie! Proud of that little girl. I also made almond butter cookies from The Paleo Mom and added white chocolate chips, some “chocolate roll-ee balls” which I may share later, and some chocolate dairy free cupcakes. For some reason, I’ve made chocolate cupcakes ever since Madison was 1.

But on to the pie!

Here’s what you’ll need for this tasty apple treat:

  • As many apples as you feel like peeling and cutting. I used about 2-3 lbs of small gala apples.
  • 1/3 cup coconut sugar
  • Juice of 1 lemon
  • A few cracks salt (I use Pink Himalayan Salt. It has a higher trace mineral content.)
  • 1 tsp ground ginger
  • 1 tsp ground nutmeg
  • 1 tsp all spice
  • 1 tsp cinnamon (If you’re not a cinnamon freak like me, drop it down to 1/2 tsp.)
  • 1/2 tsp cloves

Start off with peeling all of the apples. Then slide a handy dandy apple slicer and corer over it. This cuts the work in half! But, if you don’t have one of these handy tools (Go buy one at Dollar Tree…works just fine!), just chop them up into bite size pieces.

Add all of your apples into a large soup pot. Add all of the other ingredients and mix well. If you’re a cinnamon fanatic like me and use as much as I listed, it will be very dark. Don’t worry. Stir frequently as the juices of the apples start to come out. Keep it about on medium heat. You definitely don’t want to cook this too fast or too hot. Cook until your apples are soft. This can vary depending on the size of the slices, but really shouldn’t take more than 30 minutes. When in doubt, pick a piece out, cool it off a few seconds and pop it in your mouth!

This was absolutely delicious on a gluten free pie crust. Even though the Pillsbury pre-made gluten free pie crust is expensive (I had a coupon of course!) it was very good. Knowing that I was making so many treats, I didn’t mind paying for the convenience. These apples could be a great desert, put in a pie, or put under a crumble.

I hope you enjoy this recipe. It’s a beautiful Saturday here, the farmer’s market was a blast, and I look forward to sending you guys some more delicious recipes. Come back next Saturday and I’ll try to have something else sweet cooked up and ready for ya. You never know what this cinnamon loving Common Sense Cook will have cooked up next. Have a great weekend everyone!

P.S. If you try any of my recipes, I would LOVE to see pictures! Hop on over to http://www.facebook.com/commonsensecook Like the page and send me your pictures and comments! ❤