Sauteed Apple Side Dish (Paleo/AIP)

Sauteed Apple Side Dish

Tonight, I was met with a small dilema. I had all of the ingredients for a really great recipe….Or so I thought. I was actually missing two ingredients. These are the times when you just have to figure it out. Our local grocery store around the corner is horrible and sparse on healthy ingredients. Running to the store was not an option.

This is the true test of a busy parent and home cook. My broiler is my bff when I’m in a pinch. I threw some chicken in for 10 minutes, seasoned with salt and pepper. The true star of this dish is the apple topping. I think this saved the whole dish! It would be great on any type of meat like chicken or pork.

Sauteed Apple Side Dish

  • Servings: 4
  • Difficulty: Easy
  • Print

Ingredients:

  • 3 Sweet Red Apples (Like Gala or Fuji)
  • Basil Infused Olive Oil
  • Fresh or Dried Organic Thyme (Both work.)
  • Pink Himalayan Salt
  1. Add olive oil to a large saute pan.
  2. Sprinkle the thyme leaves into the oil. Don’t go crazy. Just a pinch or two.
  3. Turn on the heat to medium high and allow the pan to get hot so that the apples sizzle when they hit the pan.
  4. Add the apples to the pan and stir frequently.
  5. Add a touch of pink Himalayan salt.
  6. Continue to stir frequently for 10 to 15 minutes or until the apples have started to turn a lovely, golden brown.
  7. Put on the top or side of any dish to enjoy!

This is just a simple trick to keep in your back pocket for nights when you need something extra delicious, without sacrificing hours in the kitchen. It’s fast to whip up and is out of this world! I think the basil infused olive oil gives it it’s extra oomph. You can find this ingredient at local tasting shops, online, or you might look into making your own. (When I learn how I will make sure to share my experience.)

I hope you enjoy this little tid bit of a recipe. I’m sending you sweet side dishes from my Common Sense Kitchen to yours. Make sure you come back next time to see what this Improvising, Infused Olive Oil Love, Common Sense Cook will do. Don’t forget you can subscribe for an email notification, follow me on Facebook and many more social media platforms.

-Ami M. Lee, The Common Sense Cook

Chicken Cordon Bleu (Gluten Free)

Chicken Cordon Bleu

I’m sure you might have noticed that I haven’t written a recipe in a while. I have just been in a food funk. I’ve been training for the physical test I’ve mentioned in my previous posts. I’ve stuck with the same old same old. I could write some recipe reviews… But I’ve just needed something that was astounding. Something to knock the socks off my taste buds.

I went to the books I had on hand for inspiration. I had one book in particular that I hadn’t really looked at in a while… I’m not a fan of their recipes because they use a lot of “gut irritants” in their recipes even though they’re technically gluten free. They’re far from Paleo and AIP. But…I keep them on hand. You never know when they’ll inspire you. Anyone who has read a recipe of mine might know… I don’t follow recipes often. I’ve been doing this enough, I can look at a recipe and tweak it to our personal dietary needs.

Here we go…

Chicken Cordon Bleu (Gluten Free)

  • Servings: 4-6
  • Difficulty: Moderate
  • Print

Ingredients:

  • Thinly Sliced Chicken Breast (You can pound it thin with a mallet.)
  • Thinly Sliced Ham
  • Provolone Cheese
  • Swiss Cheese
  • 2 eggs or A Flax Egg (For Egg Free Option: 6 Tbsp. Water, 3 Tbsp. Flax Seed)
  • Finely Ground Almond Flour (Blanched Almond Flour works best.)
  • Blanched Slivered Almonds
  1. Preheat oven to 350 Degrees F (175 C)
  2. Depending on whether you tolerate eggs or not, mix the eggs with some salt and pepper, or mix up your flax egg. Set it aside.
  3. Use a food processor to turn the blanched slivered almonds into bread crumb sized pieces. Don’t over process or it’ll turn to almond butter.
  4. Pound your chicken breasts thinly between two pieces of plastic wrap.
  5. Add the ham and two cheeses onto the chicken and roll them tightly.
  6. Place a toothpick so that it does not come open and place the roll seam side down.
  7. Dip each roll, carefully, in the almond flour.
  8. Dip into egg or flax egg mixture.
  9. Roll in the almond “crumbs.”
  10. Place in a deep casserole dish, spaced evenly.
  11. Bake for 30-40 minutes until the internal temperature reaches at least 165 degrees F (74 C). You can check this carefully by using a meat thermometer. If you don’t have one, don’t be afraid to just cut it open. Better safe than sorry with chicken.
  12. Serve with your favorite side dishes.

You can enjoy this recipe with a salad, like picture above, or you could add another of your favorite sides. I think asparagus or cauliflower mash would be very yummy. I remember what the conventional, frozen cordon bleu tasted like. It has that an enhanced flavor with half the over processed ingredients, and 10 times the satisfaction of a job well done.

I do hope if you try it that you enjoy. If you have any questions, please feel free to ask in the comments below. Feel free, also, to experiment! Try it without the breading. Try it using crumbed pumpkin seeds… Go crazy! You have my permission to make this awesome dish awesome, in whatever way that means for you.

I’m sending you an old family classic, remade, from my Common Sense Kitchen to yours. Come back next time to see what this Paleo and AIP, Crossfitter, Professional Encourager, Common Sense Cook will come up with next.

-Ami M. Lee, The Common Sense Cook

Olive Tapenade (Paleo/AIP/Vegan)

Angel's

Angel’s in Hot Springs, AR

My husband and I were married in March of 2013 and while we couldn’t afford a honeymoon, we could afford to go down to Hot Springs for the day. We had a beautiful day with beautiful weather and happened upon Angel’s for lunch. We returned last year on our second anniversary and even though it was rainy, it was a beautiful lunch looking out the large windows. The food is amazing. It’s not really aip paleo friendly, but I happened to pick out a salad that was really great with grilled salmon.

My fondest memory of food at Angel’s is their olive dip. I’ve done a few different recreations of it and have found a great version that works for my AIP journey. If you’re not paleo you could totally throw this on some crusty bread. We enjoy it on some cucumbers and the kids have enjoyed it with carrot chips.

12512803_10153892227022386_3136856466495014740_n

Olive Tapenade

  • Servings: 2-4
  • Difficulty: Very Easy
  • Print

Ingredients:

  • 1 Jar of Kalamata or Black Olives (Try both! Already pitted olives makes this recipe a little easier. Check the ingredients for junk. Keep it as clean as you can.)
  • 1 Clove of Garlic, Minced
  • 2 Green Onions (Or to your taste. I’ve been obsessed with green onion lately.)
  • 1/4 to 1/2 cup Olive Oil (Best quality you can afford.)
  • Pink Himalayan Salt and Cracked Pepper, To Taste (Omit pepper for AIP.)

Instructions:

  1. Drain the olives in a fine strainer and rinse with cool water. This can help reduce the chances of finding fragments of pits in your tapenade.
  2. Dry them off with some paper towel.
  3. Use a sharp knife to cut up the olives. You may need to do this a hand full at a time. Take your time and do it how you like. You could puree this, but I’m not a fan of the texture when it’s pureed.
  4. Mince your clove of garlic and your green onions. Add it to a bowel with the olives.
  5. Add enough olive oil to coat the ingredients and stir.
  6. You can eat it now, or throw it in the fridge for a bit.
  7. When you’re ready to eat, pile it on your favorite snack delivery device be it cucumbers, costini, or otherwise. You can also top it with sliced almonds for some added texture and crunch.

It may seem cheesy, but this recipe warms my heart because it takes me back to some really great memories with my husband. He’s the love of my life and this recipe will always take me back to the best moments we’ve shared. Rain or shine, we have each other.

I hope you enjoy this recipe! Feel free to add things to this! A traditional tapenade has capers and anchovies and I’m considering trying to come up with something like that soon. I’ll be sure to share if I figure it out. Do you have a recipe that brings back good memories? Share with us in the comment section below!

-Ami M. Lee, The Common Sense Cook

Basic Gelatin Gummies (AIP/Paleo)

DSCN4538.JPG

May the Force Be With You! ^__^

It’s official. I am turning into the hippie paleo mom that buys her kids silicon molds and gelatin for Christmas! I purchased some cute little hearts for Madison and for the boys…What else other than Star Wars?! They weren’t very expensive at all and I can leave a link to what I bought below. (I am not affiliated with Amazon so these are NOT affiliate links. I receive no compensation for your purchase.)

I went about the interwebs searching for recipes, but what I really needed was the base recipe. Thankfully, a lovely lady in my paleo group was able to help me out with this. You need about 2 cups of liquid to 4 tablespoons of gelatin. I picked up the Great Lakes Gelatin to try because it was on sale, but I’m sure you can use whatever gelatin on hand. I even found an article on vegan gelatin substitutes for our vegan friends. If you try that out, let us know in the comments how it goes (Here’s the link: http://www.thekitchn.com/vegetarian-and-vegan-substitutes-for-gelatin-tips-from-the-kitchn-189478).

I’ve also included my YouTube video below for our visual learners! I hope you enjoy. (Subscribe at The Common Sense Cook on YouTube and get your notifications from there when I upload.)

Basic Gelatin Gummies (AIP/Paleo)

  • Servings: Varies
  • Difficulty: easy
  • Print

Ingredients:

  • 1 Cup of Juice (I used Blueberry Naked Juice.)
  • 3/4 Cup of Kombucha (I used GT’s Gingerberry.)
  • 1 Cup of Syrup (I used raw local honey, but you could use any syrup of choice such as elderberry, maple syrup, etc.)
  • 4 Tablespoons of Great Lakes Gelatin (Or other gelatin or gelatin alternative.)

Instructions:

  1. Add all of the ingredients into a sauce pan and turn on low for 5 to 10 minutes. My stove definitely took the full 10 minutes. You want to make sure all of the clumps have dissolved.
  2. Use a deep tablespoon or a liquid dropper to add the mixture to your molds. I sat my molds on a cookie sheet to make them easier to move.
  3. Let the gummies sit in the fridge for up to an hour. I checked mine at 45 minutes and they were fine, but I have a very cold refrigerator.
  4. Pop them out of the mold and enjoy!
  5. These lasted just fine in a bowl in the fridge. They were a great snack just to pop out of the fridge and hand to the kiddos.

I hope you enjoy this really easy recipe. The kids were very excited and have enjoyed getting to have such a yummy treat. Best of all there are great benefits from the probiotics in kombucha and antibacterial qualities from the local honey, which is also good for seasonal allergies as well. I may have to whip us up another batch this morning!

Make sure you come back next time to see what this Hippie Paleo, Common Sense Cook can figure out next. I’m sending happy, healthy guts from my Common Sense Kitchen to yours. Enjoy!

-Ami M. Lee, The Common Sense Cook

What I bought:

Gelatin: http://www.amazon.com/gp/product/B000KNHDRU?psc=1&redirect=true&ref_=oh_aui_detailpage_o04_s03

Heart Molds: http://www.amazon.com/gp/product/B00Q67I89Q?psc=1&redirect=true&ref_=oh_aui_detailpage_o04_s06

Star Wars Molds: http://www.amazon.com/gp/product/B007JN8918?psc=1&redirect=true&ref_=oh_aui_detailpage_o04_s10

Cheesecake Filling (Gluten/Egg Free)

DSCN4212

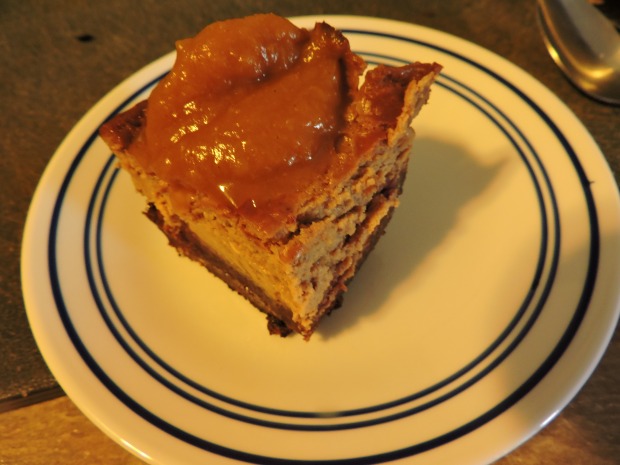
My first Egg Free Cheesecake with Pumpkin Butter.

This year I have been faced with a new challenge. My youngest was diagnosed with an egg sensitivity. It really came out of no where. He deals with really bad eczema on his legs and we will be doing more testing next month to try to pin point the cause. He’s had this since he was a year old. I was thinking of going ahead and letting him eat the cheesecake with eggs and use my conventional gluten free cheesecake recipe that I guest posted on for Moody Sisters Skincare (Here’s the link: http://www.moodysistersskincare.com/blog/2015/8/11/scrumptious-strawberry-cheesecake-recipe). But, no. I had to figure out how to do this cheesecake without affecting this cutie patootie!

I will admit that my crust did not turn out. The crust in the recipe above is really awesome if you tolerate nuts, and chocolate. But…I tried something out to avoid the chocolate (because caffeine in the chocolate hates me)… And yeah. We don’t always win. Thankfully, the filling was awesome! So here we go.

Cheesecake Filling (Gluten/Egg Free)

  • Servings: 4-6
  • Difficulty: easy
  • Print

Ingredients:

  • 2 – 8 ounce packages of Cream Cheese, At Room Temperature (Choose your quality. If you can afford organic/grass fed, go for it! But don’t feel obligated.)
  • 2 – 8 ounce packages of Mascarpone, At Room Temperature
  • 1 1/4 Cups of Coconut Sugar
  • Flax Egg (2 Tablespoons Flax to 3 Tablespoons of Water)
  • 2 Teaspoons Fresh Lemon Juice
  • 1 Teaspoon Vanilla Extract
  • A Tiny Pinch of Pink Himalayan Salt

It is very important that you have your ingredients at room temperature. Don’t skip this step. Also, because this recipe is only for the filling, take care of your crust now so it can be pre-baking (if needed). Preheat your oven to 375 degrees Farenheit.

  1. Mix your flax egg at the proportions above. Stir until it is well mixed and place in the fridge for 15 minutes. This is what will replace the eggs. If you have issues with flax, try a gelatin egg instead! (And let me know below if it worked!)
  2. Mix the cream cheese, mascarpone, and coconut sugar together until well combined.
  3. Add your flax egg. You might be cautious and add it in a quarter at a time and mix as you go.
  4. Add the final ingredients of the lemon juice, vanilla extract, and pink salt and mix until it is all well combined.
  5. Taste, taste, taste! It doesn’t have raw eggs so go ahead and give it a try to see if you’d like to add something else. (I wonder how pumpkin pie spices would be…)
  6. Add your filling to your crust. This makes a LOT of filling so I made sure to put some parchment paper in the dish so that I could avoid spillage and after it set, I could pull it right out of my pan. (I didn’t have a spring form pan this time.) I also didn’t worry about the water bath since I didn’t have the right pan. I used a deep, square, glass pan that worked great!
  7. Bake at 375 degrees Fahrenheit for 45 minutes to 1 hour and 5 minutes. Keep an eye on it, because it could come out earlier.
  8. Let the cheesecake completely cool. This is very important. Do not put a hot cheesecake in the fridge, my friends.
  9. Cover lightly and refrigerate over night and wake up to an amazing cheesecake!

I hope you will give this filling a try. Find your favorite crust and try your best to share with your friends or family, even though it’s tough. I actually topped this off at Thanksgiving with some pumpkin butter. I used this recipe from The Paleo Parents (http://paleoparents.com/2011/pumpkin-butter-and-apple-butter/) but feel free to use any fruit or sauce that you love.

I’m sending you a yummy alternative of an old favorite from my Common Sense Kitchen to yours. I hope you’ll come back soon and see what else I can whip up for the holiday season.

-Ami M. Lee, Cheesecake Lover, Not Afraid to Fail, Common Sense Cook

Holiday Turkey

Holiday Turkey

Some for me and Some for the Bird…

This year, I wanted make my Thanksgiving experience a little bit easier. I wanted to have fun, not stress out. Last year I was in the middle of brussel sprouts and my back gave out and I had to stop. This year, for a few reasons, I decided to keep it simple. This also included my turkey. I’ve also done this with whole chickens as well.

Here’s what you’ll need for a stress free Turkey:

Holiday Turkey

  • Servings: 4-6
  • Difficulty: moderate
  • Print

  • Fresh Whole Turkey (I had a 10 pound bird.)
  • Kerrygold Grassfed Butter
  • Garlic
  • Pink Himalayan Salt
  • Fresh Cracked Black Pepper
  • Fresh Organic Sage
  • Lemon
  • Half of a Fresh Onion
  • Olive oil
  • 1 – 2 White Wine of Choice (Pick something you’ll drink. I used Moscato.)
  • 2 Cups of Bone Broth

Preheat oven to 325  F Degrees

  1. Remove all non-turkey pieces including packaging, giblets, and plastic.
  2. Remove the wish bone for easier carving along with the end of the wings. The wings can be completely removed and saved for bone broth.
  3. Gently slide your hand under the skin to loosen it. Then add a mixture of butter and the seasonings underneath. Feel free to experiment with the seasonings.
  4. Add the lemon, onions, and some whole garlic and more seasonings into the cavity of the bird.
  5. Add it to a large and deep casserole dish. Pour in the wine and bone broth. It should not cover the bird. No more than half way up.
  6. Bake in the oven for 2 hours with an aluminum foil tent. Remove it (carefully) for the last 45 minutes. Time can vary for the the size of the bird. My packaging came with a chart, so check that out or see our trusty friend Google.
  7. Let it rest! You really need to let it rest for at least 30 minutes.
  8. Carve and serve.
  9. Enjoy

I hope you enjoy this recipe! This was a wonderful time. I spent more of my time enjoying my family instead of slaving away in the kitchen. We had mashed potatoes, gluten free dressing, bacon braised kale, honey butter, and rolls.

The greatest compliment was from my Uncle Rick. He’s a great cook! He’s been cooking a very long time and makes that great, home cooked, southern food, including some Cajun food. He told me he was really impressed. That just warmed my heart. Best compliment in the world.

Consider trying this recipe so that you can stress less about that turkey and concentrate on the real reason for the holidays. Spending time with your loved ones.

I’m sending you happy bellies from my Common Sense Kitchen to yours. Come back next time for more holiday recipes!

-Ami M. Lee, The Common Sense Cook

Roasted Bacon Wrapped Asparagus (Paleo/AIP)

Roasted Bacon Wrapped Asparagus

The last couple weeks have been crazy! I’ve been experiencing a lot of changes, and it’s still difficult having my husband away at training. Thankfully…Only three more weeks left till his graduation. I wasn’t feeling too hot last night, a little depressed. Food didn’t even sound good. I could have just skipped supper and gone to bed if it wasn’t for the kiddos. I wanted something fast so I knew I could trust my ole buddy, ole pal the broiler.

What I ended up with was superb! I broiled some honey glazed chicken. Whipped up some cauliflower mash, and the star!

Here’s what you’ll need:

  • 1 Pound of Asparagus (Cleaned and Ends removed.)
  • Thick Cut Bacon
  • 25 Star Balsamic Vinegar (Or a good vinaigrette.) -Optional-

Cover a cookie sheet with non-stick foil, or parchment paper. Cut your bacon strips in half. Wrap it neatly around the asparagus and carefully place them so that the seam is on the bottom.

Turn the broiler on high and cook for 8-10 minutes or until sufficiently cooked. This can depend on your oven. Remember to never leave anything while it’s cooking under the broiler. Carefully, pull them out of the oven and flip them over. Add them back in under the broiler for another 2 minutes until the other side is done.

Add them to a lovely platter and drizzle a great balsamic vinegar over top and voila! You have a plate full of awesome!

You may be wondering about that kiddo approval rating? I totally got a 3/3 and was thoroughly impressed. They actually like asparagus! It’s not a fluke either because I’ve gotten them to eat it before. (Check out my salmon recipe!)

I hope you’ll try this out! It’s very quick and easy. This would be great for a holiday party! Just make sure to drain the fat for easier party consumption.

I’m sending you quick, yummy treats from my Common Sense Kitchen to yours. I’ll be back soon with some more delicious holiday recipes.

-Ami M. Lee, The Common Sense Cook

Lemon Pepper Marinated Chicken Wings (Paleo/Gluten Free/Aip Options)

I brag a lot about my kiddos. Truly, I know I am biased but I have really been impressed with my oldest getting interested in cooking. She’s constantly asking to help and I’m always trying to find something for her to do. It may be because some of our favorite shows are Gordon Ramsay’s including Master Chef Junior. They even call the back yard our “garden.” Madison even comes up with some good ideas from time to time.

I ask the kids every week what they would like to eat. I believe this helps them feel like they’re included in the decision and they’re more likely to eat it. This week Madison said, “I want some chicken wings. Please!” A great idea was born and I even added it to my batch cooking for the week.

Here’s what you’ll need:

  • A pound of Chicken Wings (I used the drumette ones.)
  • The Juice of One Large Lemon
  • Olive Oil (Varies… Add enough to coat, but not drown.)
  • Fresh Cracked Pepper (Omit for AIP)
  • Pink Himalayan Salt (To Taste)

I would have to say my favorite recipes are the ones with the shortest ingredient lists. To marinate this ahead of time, add all of the ingredients into a ziplock or other container of choice. Let marinate for a few hours, overnight in the refrigerator, or freeze until needed. Make sure to defrost under refrigeration the night before if you do freeze them.

Remove the chicken from the bag and toss the left over marinade. There are two ways that you can cook this; under the broiler or on a grill. You choose! But I’m thinking the grill is always the best. You can stress relieve by hanging outside in the sunshine, with your loved ones, and cook at the same time. Just make sure they’re fully cooked in the middle. Remember, the smaller the wings, the less time they take. Cooking times will vary, but if working with your broiler do it in 5 minute intervals, and flip. Return it to the oven until done and desired color.

It’s really that simple. My favorite kind of recipe! I hope you’ve enjoyed this recipe. No picture yet, but as soon as I pull out the next batch I’ll be sure to update. Until next time, I’m sending you easy to pull off meals, from my Common Sense Kitchen to yours.

-Ami M. Lee, Batch Cooking Wizard, The Common Sense Cook

Homemade AIP Beef Sausage (Batch Cooking Friendly)

sausage without subtitles

The last few weeks have been down right strange. We’ve had 90 degree weather through October her in Arkansas… And now Mother Nature has decided to make up for it with nearly a week of rain. My computer is not wanting to upload videos so I figured I’d get a blog to you guys so I don’t get too far behind. It’s taking about a day for each segment to upload so I’m hoping I can at least get the batch cooking video up by Sunday. So here we go my friends! I shall fight this craziness head on and keep my head where it belongs. Now, I have shared in a previous post how I like to do sausage with ground pork. To check out that recipe Click Here.

In the last few months I have started to have histamine issues. Pork is one of those troublesome foods. I don’t cut it out, but I do try to avoid eating it every day. Beef sausage has become my favorite sausage simply on the account of the flavor. Feel free to give both a try though!

Here’s what you will need:

  • 1 Pound of Ground Beef (I did 4 pounds, got six patties for batch cooking.)
  • Minced Fresh Garlic (My favorite but use powdered if you prefer.)
  • Pink Himalayan Salt (You can add fresh cracked pepper if you’ve reintroduced it.)
  • Herbs De Provence (Or other seasonings of choice. Basil would be great.)

Take a food processor and add everything in. This may seem odd, but what happens is that it becomes that sticky, weird sausage like consistency. I also use this trick for meatloaf because it binds the meat together without the use of eggs. We just recently found out our youngest is sensitive to eggs.

Once your meat is well blended you can package and freeze, you can make patties, you can cook and eat…The ideas are endless! It’s so simple that I couldn’t go back to regular store bought versions of sausage.

I hope you enjoy this simple recipe. These were great this morning! I just defrosted them and cooked them in a skillet. They did get considerably smaller, but they were so good, I didn’t mind. Be sure to check out my latest video on YouTube at The Common Sense Cook! I’m sending you a yummy breakfast to fuel your morning. Be sure to come back and see what this Crazy Common Sense Cook can come up with next.

-Ami M. Lee, The Common Sense Cook

Not Every Recipe is A Winner – Common Sense Philosophies

Grilled Shrimp on a Baby Spinach Salad

Not every recipe is a winner. If you’re new to cooking, I think it’s important for you to know this. Now, I admit I do have an uncanny luck with liking most things that I make. My husband was shocked one day when they liked a dish and I refused to eat it because I didn’t like the flavor. It’s rare, but I promise I don’t always like everything I come up with…but my biggest message is…That’s okay!!!

One reason I like doing review blogs on recipes by other bloggers is because I want you guys to know these recipes are accomplish-able. I like to show you guys which recipes I’ve tried. Now…I think my first review was my only negative one and I immediately decided that I did not want to do another negative review. We all have different opinions…We all have our own food issues. For instance…Since going paleo for well over a year now I am not fond of most gluten free bread like products. I have given up on finding a pancake that I like. It’s just a texture issue for me. However, there are several good recipes out there that many people like. My goal is never to discourage anyone from at least trying a recipe.

When you’re cooking you have to be reasonable with your expectations. Not every recipe is going to be right for you. There may even be ingredients that you are just not ready to try. I, frankly, love to try anything and everything. I learned the hard way that I’m not a fan of short ribs. The flavor is just not something I care for. I’ve tried making up my own recipe. I’ve tried other recipes. I’m just not a fan…Again…That’s okay!

The picture above is actually shrimp sauteed in butter, lemon, and pepper. The shrimp turned out really soft and the butter flavor over powered the shrimp. It just didn’t taste good. I was not a fan of the texture either. Grilled shrimp would be a much choice for this salad in hind sight.

Things I’ve learned when choosing and trying recipes:

  • Go for it! Don’t be afraid to try it.
  • Modify when you know what you like. If you know you prefer basil over thyme…Do it! Try it!
  • Recipes are not written in stone. Experiment. Use the recipe as a guideline when you’re comfortable enough to experiment.
  • Keep time in mind. Do you really want to try to master bouef bourguignon on a Wednesday night?
  • Don’t be afraid to make your own recipe! (Have you seen the tab that says “Stuff I Make Up”?)
  • Shop local and in season as much as you can for inspiration.
  • Stay inspired and watch others cook, such as cooking shows, or on YouTube.

To end this Common Sense Philosophies post, I want to remind you my dear friends, just because the recipe isn’t a winner, doesn’t mean you’re a loser. You are still winning with experience points. Every meal is a lesson and you get a chance three times a day to try again, and learn more. I told my husband the other day, there’s nothing in this world that I wouldn’t want to learn. The day I stop learning is the day I’m ready to move on to the next life to learn something new there.

Keep on cooking friends and come back next time. I have several recipes and a review coming up that I am so very excited to share with you. I’ll be reviewing He Won’t Know It’s Paleo’s Red Wine Pasta Sauce…and I have figured out my AIP Bouef Bourguignon. Thank you guys for your continued support. It is so greatly appreciated.

-Ami M. Lee, Experimenter, Mad Hatter Chef, The Common Sense Cook